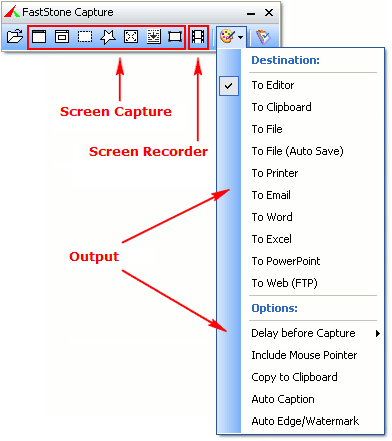
Capture Panel (Toolbar)

There are 3 ways to trigger a capture function:
Click on one of the capture buttons


Capture Active Window <Alt + PrtSc> 
Capture Window / Object <Shift + PrtSc> 
Capture Rectangular Region <Ctrl + PrtSc> 
Capture Freehand Region <Ctrl + Shift + PrtSc> 
Capture Full Screen <PrtSc> 
Capture Scrolling Window <Ctrl + Alt + PrtSc> 
Capture Fixed Region <Ctrl + Shift + Alt + PrtSc> Or press a hotkey. For example, by default, pressing <Ctrl + PrtSc> key combination will activate Rectangular Region capture. Hotkeys can be configured in the program Settings
Or right click on the tray icon
 in the System Tray area
  and select a capture function from the pop-up menu
Before making a capture, make sure the desired destination is selected. Click on the Output button
 where you can then select one of the following destinations for the captured image. Check option "Preview in Editor" if you want to edit the image before sending it to the destination
To Editor - captured image will be opened in the internal editor
To Clipboard - captured image will be sent to the Windows Clipboard
To File - a "Save As" dialog will open to save the captured image
To File (Auto Save) - captured image will be saved to a specified folder automatically
To Printer - captured image will be sent to the print dialog
To Email - captured image will be sent to the default email client program
To Word - captured image will be sent to Microsoft Word
To Excel - captured image will be sent to Microsoft Excel
To PowerPoint - captured image will be sent to Microsoft PowerPoint
To Web (FTP) - captured image will be sent to a specified FTP Server
Additional output options:
Delay before Capture - If you need time to prepare the windows or menus before the capture function activates, you can use this option to add a delay in seconds
Include Mouse Pointer - include the mouse pointer in the captured image
Copy to Clipboard - automatically copy the captured image to Clipboard
Auto Caption - automatically prompt for a caption that will be added to the top/bottom of the captured image
Auto Edge/Watermark - automatically apply Edge/Watermark effects
Preview in Editor - allow you to edit the captured image before sending it to the specified destination such as clipboard, printer, email etc. This option is disabled when the output is "To Editor"
During screen capturing, right mouse click or press Mouse Wheel or press Esc to discontinue
Click on
 to minimize the Capture Panel to the System Tray area, which keeps the program running in the background with very little CPU/memory usage
Click on
 to terminate the program
Click on the tray icon
 in the System Tray area to minimize/restore the floating Capture Panel
Use Capture Scrolling Window
 to capture oversized areas such as a scrolling file/folder list, a PDF file in Adobe Reader or a web page in a web browser
There are 2 ways to open an existing image file in its internal editor:
Drag the image from Windows Explorer and drop it onto the Capture Panel
Or click on the "Open File in Editor" button
 on the Capture Panel and select the image in the Open dialog


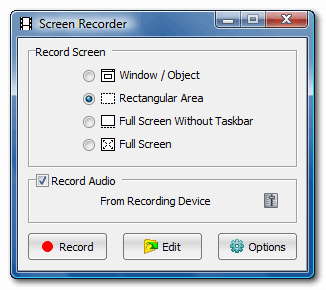
 to record screen activities into video files
  to add annotations (texts, arrows, highlights etc.) and zoom effects to screen video files